info@skybots.in
+91 8754531574
Location
| What is this course about | 3:39 |
| Parts and Tools | 0:08 |
| Crius or Pixhawk? Read this before you continue | 0:29 |
| Introduction | 2:00 |
| Another drone classification | 5:07 |
| Types of multi-rotor drones | 12:04 |
| Roll, pitch, yaw | 5:07 |
| Controlling the motors | 4:58 |
| Procuring the right parts | 16:41 |
| Terminology | 7:43 |
| Propellers | 8:41 |
| Battery and charger, Part 1 | 10:03 |
| Battery and charger, Part 2 | 8:21 |
| Flight controller and its peripherals | 4:22 |
| Other tools and things | 5:56 |
| Conclusion | 1:08 |
| Introduction | 0:48 |
| Preparation | 3:54 |
| Attach the connectors to the ESC wires | 14:36 |
| Attach connectors to motor wires | 6:09 |
| Conclusion | 1:10 |
| Introduction | 0:43 |
| About the power distribution board | 2:36 |
| Solder the ESC power wires | 7:42 |
| Solder the battery wires and connectors | 19:12 |
| Conclusion | 0:27 |
| Introduction | 0.32 |
| Attach the motors to the arms | 4.40 |
| Attach the arms to the power distribution board, Part 1 | 6.51 |
| Attach the arms to the power distribution board, Part 2 | 3.27 |
| Conclusion | 0.45 |
| Introduction | 0.59 |
| The PWM and PPM signalling options, Part 1 | 4.25 |
| The PWM and PPM signalling options, Part 2 | 9.12 |
| Setup radio receiver and flight controller to use PWM | 7.11 |
| Connect the GPS module to the flight controller, Part 1 | 10.19 |
| Connect the GPS module to the flight controller, Part 2 | 3.50 |
| Connect the GPS module to the flight controller, Part 3 | 2.51 |
| Connect the GPS module to the flight controller, Part 4 | 6.30 |
| Attach flight controller to chassis | 9.04 |
| Connect ESCs to flight controller | 12.54 |
| Conclusion | 0.51 |
| Introduction | 0.21 |
| A primer on batteries | 24.40 |
| How to charge the battery | 11.52 |
| Attach the battery to the frame | 5.13 |
| Conclusion | 0.18 |
| Introduction | 0.46 |
| Clear the EEPROM | 2.40 |
| Download and install the firmware | 3.48 |
| Conclusion | 0.26 |
| Introduction | 0.26 |
| Binding receiver and transmitter | 3.07 |
| Understand the transmitter basic operations | 8.40 |
| Conclusion | 0.26 |
| Introduction | 0.40 |
| Download and install Mission Planner | 4.48 |
| Mission Planner setup, Part 1 | 7.33 |
| Mission Planner setup, Part 2 | 7.47 |
| Test the GPS module | 1.25 |
| Conclusion | 0.27 |
| Introduction | 1.55 |
| Calibrate the ESCs | 5.59 |
| Attach the propellers | 8.13 |
| Safety and legal issues | 13.32 |
| Conclusion | 0.23 |
| Introduction | 0.21 |
| Pre-flight checks | 4.17 |
| The first flight | 8.47 |
| Conclusion | 1.01 |
| 800 - Section introduction | 2.39 |
| 810 - Why upgrade- The Pixhawk flight controller | 11.47 |
| 820 - Disassembly | 3.33 |
| 830 - A review of the upgrade components | 7.19 |
| 840a - Assembly Part 1 - Propellers | 6.10 |
| 840b - Assembly Part 2 - ESC red wire insulation | 7.36 |
| 840c - Assembly Part 3 - Pixhawk base | 7.51 |
| 840d - Assembly Part 4 - GPS antenna | 11.02 |
| 840e - Assembly Part 5 - Pixhawk assembly | 7.02 |
| 840f - Assembly Part 6 - Buzzer, safety button, power module | 8.25 |
| 840g - Assembly Part 7 - Wirings | 8.46 |
| 840i - Battery and power connections | 18.41 |
| 840h - Verify wiring in Mission Planner | 8.49 |
| 850 - Attach the propellers | 7.17 |
| 855 - ESC calibration with the Pixhawk and safety switch | 1.45 |
| 860 - Calibration and test flight | 10.32 |
| Objectives of this upgrade | 2.04 |
| The MATEK F405TE flight controller: an introduction | 17.15 |
| Disassemble the Pixhawk drone | 9.37 |
| Prepare for the assembly: what you'll need | 14.24 |
| Soldering of wires and connectors | 19.22 |
| Assembly Part 1 | 9.01 |
| Assembly Part 2 | 10.07 |
| Assembly - Extended version | 35.04 |
| Wiring verification and first boot | 7.50 |
| Upload Ardupilot firmware to the MATEK f405TE | 7.27 |
| Pre-flight calibration with Mission Planner | 23.42 |
| Calibration for new EMC and motors | 5.15 |
| Pre-flight modifications | 8.18 |
| Test flight | 8.41 |
| What's next? | 1.48 |
| Bonus lecture | 0.43 |
In August 2023, I have updated the course with new lectures and a new flight controller. In the new lecture I show you how to upgrade your drone to use the popular MATEK F405TE flight controller. I have also added lectures about batteries and drone classifications.
The MATEKSYS F405-TE is a perfect fit for our learning objectives. It's a minimalist yet powerful flight controller, making it an excellent device to explore.
Also, by transitioning to the MATEKSYS F405-TE, I can lower the overall cost of our drone without compromising its performance or capabilities. This will make our quadcopter design more accessible to hobbyists on a budget, which aligns with my mission to make drone technology more attainable and exciting for everyone.
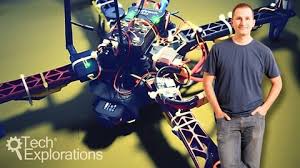
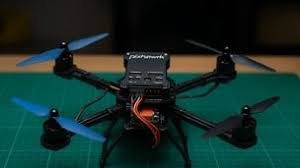
Welcome to "Make an Open Source Drone", a course that will teach you how to build a quadcopter from scratch!
Playing with drones, and especially quadcopters, is fast becoming a very popular hobby. As a hobby, it combines state of the art open technology with large open spaces. It even gives me a great excuse to get out of my lab and get some sun!
While you can just go to a shop and purchase a drone that is ready to fly, by doing so you miss out on all the fun and knowledge that comes with building your own flying machine. I admit I have done that myself. Getting my ready-to-fly drone out of its box and flying it was fun, but only for a short period.
Soon after the first excitement settled, I realised that I didn't know much more than before I opened the box. I was also unable to do anything more than what the drone was programmed to do, to begin with.
That is why making your own open source drone is such a great way to have fun while learning.
in this course, my co-instructor Aristofanis and I will help you understand drones and how to build them. You will learn about their mechanical and electronic components and how they interact. You will learn about the software that provides semi-autonomous flight capabilities to drones.
Motors, flight controllers, Electronic Speed Controllers, batteries and chargers, receivers and transmitters, and so much more, will all make sense as you progress through this course and go through the process of assembling your drone.
By the end of the course, apart from being able to assemble your drone, you will have the confidence to perform repairs and to extend its capabilities.
Along the way, you will learn about the principles of drones and many design and performance details for each of the components and software. With this knowledge, you will be able to go on and construct your own drones, configure and program them, all while having a great time doing so.
The course starts by explaining the basic principles of drones.
You will learn about the types of multi-rotor drones, flight terminology, principles of drone flight, and we will introduce the basic drone components like propellers, motors, the flight controller and more.
Then, you will get into the actual construction of the drone. You will solder the Electronic Speed Controllers to the motors and assemble the drone arms.
You will then solder the ESCs and battery to the power distribution board, and start the assembly of the drone frame.
After that is the radio control subsystem. You will learn about the different types of signalling, connect the radio receiver to the flight controller, and connect the GPS module.
Next, you will learn about LiPo batteries and battery chargers, safety and maintenance.
With a fully charged battery, you will continue with the firmware and software. You will learn about the MegaPirateNG firmware and how to upload it to your drone.
You will learn how to bind your radio transmitter and receiver, and then how to calibrate your new quadcopter using the open source Mission Planner software.
As always, we save the best for last! At the end of the course, you will learn how to calibrate the Electronic Speed Controllers and attach the propellers.
And in the end, you will be able to take your drone to a field and launch it, starting to build-up your pilot skills!
As with all Tech Explorations courses, we are here to help you in this exciting learning journey. As a student of this course, you will have access to the Questions and Answers board and interact with the instructors. You can ask questions, and make comments or suggestions.
Please continue by having a look at the list of parts that you will need in this course. You can find it as a document download in the next lecture.


Incorrect OTP
Incorrect OTP
Designed and Developed by B2L Mobitech Pvt. Ltd.
Incorrect OTP
Designed and Developed by B2L Mobitech Pvt. Ltd.